Showing posts with label appetizer. Show all posts

Monday, August 13, 2012

The Perfect Jilapi (Jalebi)

It's been little more than two months that I've been in Spokane and I'm already deeply in love with the town. It's been a glorious summer and a much needed break after a grueling first year of dental school. But leave I must. I fly out to Philadelphia tomorrow to start my second year of classes. Oh Penn, how I hate you right now. It's hard to imagine three more years of flying back and forth. But, since I've managed to survive this far hopefully I'll live through the rest as well. On the bright side, I do get to see my friends after the break. So it can't be all that bad. Enough with the whining. Let's simply end the summer on a sweet note, making something that reminds us (me and the hubby) of home and warmth and sweetness.

Traditionally sweets, such as the one I talk about today are a very integral part of Bengali culture. They are offered when guests arrive or they are treats that guests bring as gift. There is a warm, soothing quality to it which comes from the gentle use of spices like saffron or cardamom and the rich sweetness solidifies their status as cherished treats. Being deep fried and then soaked in a flavored sugar syrup, it is not the usual end to an everyday meal. But for special occasions there can be nothing better than a Jilapi/ Jalebi.

This is a relatively hard dish to master but the end results are completely worth the pain.

Jilapi batter
1 cup plain flour
1 and ½ tablespoon gram flour (besan, also known as chickpea flour)
1 teaspoon yeast
1 tablespoon oil
1 teaspoon sugar
3/4 cup of lukewarm water

Sugar syrup
1 cup sugar
1/2 cup water
1/2 teaspoon lemon juice -- to prevent crystallization
1/2 tablespoon rose water (optional)
pinch of cardamom powder (optional)


Dissolve yeast in warm water and wait for 5 minutes till the yeast blooms.

Add all the ingredients to make the batter. You can choose to add more or less water to achieve the right consistency, which should be like a pancake batter. Leave aside covered with a clear wrap or a kitchen towel for at least an hour.

If you are making jilapi the next day it's completely ok to stick this in the fridge. Just make sure to take it out at least an hour before you actually fry the batter.

Now onto making the syrup. Heat up the sugar water mixture and stir with a wooden spoon. Boil till you reach a one thread consistency ( at the thread stage there's still a lot of water left in the sugar and the temperature on a candy thermometer should be around  215 degree F or 101 degree C). At this stage, usually I barely touch the spoon with my index finger, then touch the index finger with the thumb and gently pull apart. If one thread is formed then the syrup is done. And you immediately switch off the flame. If you feel that the sugar is getting too thick add a little more water and boil again. If you will be adding cardamom, saffron or rose water do it at the beginning or the end. It really makes very little difference.

Now on to the actual frying bit. Heat up at least an inch of oil in a cast iron skillet or your favorite frying pan. The oil needs to be at a temperature so that when you drop a little batter it sinks for barely a second before rising to the top and sizzling.

Hold the empty bottle or ziplock bag full of jilapi batter (with one end snipped) and pipe concentric circles into the hot oil quickly making sure to join the ends. Speed is your best friend here. Do it slowly an you end up with squiggly jilapi. But it'll still taste good.

Fry the jilapis till they are golden brown on both sides. and set aside.

Transfer the fried jilapi one by one into the sugar water slurry and dip completely for 20-30 seconds. The hollow jilapi will take in the flavored sugar syrup while remaining crispy on the outside.

Serve warm.
Enjoy.
Do not eat everyday.
That is all...

Tuesday, June 26, 2012

Stuffed Mushrooms

The best kept secret since no-knead bread would be the fact that it is A-ok to wash mushrooms. Forget about brushing or wiping with damp paper towel to clean the mushrooms. Not only does it take longer but look closely and you will find dirt in the crevices. So take your simple button mushrooms give it a wash under cold water and let's get to stuffing them.

Stuffed mushrooms- the recipe is from epicurious.com. I tweaked just a wee bit.

18-20 mushrooms
2 tablespoon extra virgin olive oil
1/2 cup chopped shallots/ onions
3 garlic cloves
7-8 oz shrimp
2/3 cup Panko bread crumbs
1/2 cup Pecorino Romano
1/4 cup mayo
1/4 cup chopped basil
 pinch of pepper flakes

The hubby brought home fresh button mushrooms the other day and I had this 'urge' or dare I say 'need' to stuff them.

Being fresh the stems popped right out. I saved about half the stems to add to the stuffing mixture. If yours does not come right out run a knife along the edge of the stems to get it to come out.

Grate yourself some fresh Pecorino Romano or Permigiano Reggiano. Believe you me, fresh cheese does make a world of difference.

Gather minced shallots, garlic and fresh basil leaves. I picked mine from the herb garden in my patio which is growing beautifully. p.s. expect fresh basil in many more of my summer recipes.

Saute shallots, garlic for a minute or so in olive oil and add the chopped up stems from half the mushrooms.

Cool the mixture and add the rest of the ingredients. Stuff the mushroom really well and quite high and bake on a well oiled baking sheet for 35 minutes at 350 F.Serve warm with julienned basil on top.


Sunday, January 1, 2012

Frittata with a Touch of Desi Spice

Frittata is a dish very similar to an omelet. Vegetables are sauteed, beaten eggs are poured on top and then cooked on low heat or baked or broiled till the eggs sets up. This Desi flavored frittata uses onions, green chilies, tomatoes and gets its warmth from a little bit of ginger and a touch of cumin. Tastes marvelous with paratha.   

4 Egg whites
8 Cherry tomatoes
Oil
1/4 cup Onion (chopped)
2/3 green chilies
salt
cumin
ginger paste

Chop up onions, tomatoes and green chilies. Cherry tomatoes can be substituted with any other kind. 


Saute onion and chilies in oil till the onion turns translucent. This will take about 2 minutes 


After a while add tomatoes, ginger paste and cumin powder.


Keep cooking till the tomatoes are mashed up. This will take another 5 minutes or so.


Now add in the egg whites that have been beaten with a fork. instead of egg whites feel free to use 3 whole eggs.


Lower the heat and wait for eggs to set. Once you've poured the eggs, do not attempt to stir as you will end up with scrambled eggs. At this stage you can put the entire pan in the oven on broil for a few minutes. 


Or fold it over to give an omelet feel to it. 


Once cooked, plate it up and serve warm with any naan or paratha or any other bread of your choosing.


As always..ENJOY!!


Jalapeno Poppers

Warning!! This dish has the potential to be very very hot. It might make you feel like your mouth is on fire, it can bring tears to your eyes, but who's to say that you won't enjoy that.... 

25 Jalapeno peppers
12 ounces cream cheese
8 ounces shredded cheese (mozzarella or cheddar)
1/2 cup flour
1 egg
1 cup bread crumbs 

I've used both red and green peppers here because they just look so much more cheerful. :)


Slit the peppers in half, leaving the stem intact. Makes for better presentation.


The seeds are where the heat comes from. So de-seed the peppers with your fingers or use a spoon. If using hands wear disposable gloves as these can burn for hours if you are not used to handling peppers. I usually leave a few seeds in there because I simply love the heat.


Mix together cream cheese and the shredded cheese. It's easier to mix if cream cheese is at room temperature. 


Stuff the peppers.


Now the job goes really fast if there is a work station of sorts. Dip the stuffed peppers first in flour, then in egg, and lastly roll it in bread crumbs.


Let the coated peppers rest for about 10 minutes, after which they can be deep fried or baked.


I usually bake these at 325 degrees for 20-25 minutes or till they look golden brown. Serve as an appetizer or a side dish with plenty of water on the side. :)

Tuesday, September 6, 2011

Beef Patties

I've started dental school last week. :)
Things aren't crazy busy yet but it's getting there.God knows when I might be able to post again. Before I take a short break I wanted to post a recipe one of my dear friends (you know who you are!!) has been asking for. This is one of those dishes very close to my heart. "Google" it you'll find Jamaican beef patties everywhere but not the Bengali kind. The kind of beef patties I grew up with were made with a spicy mince meat filling inside a puff pastry crust. The meat is cooked first with different spices, made into triangular shaped patties, and then baked for 20 minutes. Once made, the unbaked ones can be stored in the freezer for 3-4 weeks but in my house they rarely last that long. Without further ado, here's the recipe.

Beef Patties 

Makes 25-27

Prep time: 30 min
Cook time: 20 min
Bake time: 20 min


Minced Meat(Keema in Bengali)- 1 lb
Oil- 2 tablespoons
Medium sized onion- 1
Green chili- 4
Ground pepper- 1/2 teaspoon
Soy sauce- 2 tablespoons
oyster sauce- 2 tablespoons
Ginger paste- 2 tablespoons
Garlic paste- 3 tablespoons
Cumin powder- 1/2 teaspoon
Salt- 1/4 teaspoon
Corn flour- 1 tablespoon
Store bought puff pastry sheets

To make the filling slice a medium onion into thin half moon shaped slices.

 Fry in oil till they are translucent and barely start to get color.

Then add the minced meat and all the other ingredients except for the corn starch and cook on medium heat for 15-20 minutes, till the meat is cooked completely.

Add the corn starch 3-5 minutes before taking the pot off the heat and make sure to cool the filling first before making patties. Adding the corn starch will ensure that the filling sticks together as opposed to crumbling apart.

Now that the filling's ready, it's time to take out the pastry.

I use Pepperidge Farm puff pastry sheets when I'm making this. Each box has two sheets and from each sheet you get 18 patties. So for a pound of meat, I use one and a half boxes which makes 27 patties.

First thaw the sheets according to package directions and open up the folds. I usually do one sheet at a time. Lay it flat on a surface and cut into 9 pieces following the folds.

Place about 1 tablespoon of the cooked minced meat mixture on each square.

Seal the edges really well forming little triangles.

Here's another random shot of a few more right before they head to the oven.

Bake at 425 degrees F for 20-25 minutes till they get a vibrant golden color. Pick your favorite condiment and enjoy!! :)


Friday, August 12, 2011

Shrimp roll

You know what’s better than having a warm bowl of soup. Having a warm bowl of soup (check out my recipe for Tom Yum soup) and munching on shrimp rolls that are crispy and delicate at the same time.

The outer layer of this popular Bengali restaurant dish is made with spring roll wrappers you get at your regular grocery store but the marinade requires a couple of specialty sauces, two to be exact. Thai sweet chili sauce and green chili sauce. The combination of these two sauces imparts a mildly sweet yet spicy flavor that makes these rolls very different from your regular spring rolls. Both sauces  are available at Asian markets or Indian groceries and will be a great addition to your pantry as they are good for a couple of months and can be used in a myriad of different dishes.

Also did I mention....
these rolls are made with whole shrimp and nothing else and then deep fried.   Bake them for a healthier version but sometimes it just feels soo good to indulge.

Recipe
20 shrimps
10 sheets of spring roll wrapper
1 teaspoon minced garlic
1 teaspoon soy sauce
1/2 teaspoon sesame oil
1/2 teaspoon black pepper
1 tablespoon sweet chili sauce
2 teaspoon green chili sauce
1 teaspoon corn starch

To seal the wrapper 
1 tablespoon water
1/4 cup water

Fresh shrimp from the farmers market. You can also buy tail on raw shrimp to make your life easier. I, for one, don't mind the extra work. I'd rather go the extra mile.
Clean and devein the shrimp and nick the inside a couple of times so that the shrimp don’t curl up. Here’s a little clip that demonstrates how to keep shrimp straight.


Get the marinade ready.
Marinate for 15 minutes. Doesn’t look very appetizing does it? Patience grasshopper. ;)
Soak up excess moisture with a paper towel. Cause we all know what happens if there’s water when you are deep frying. Don’t wory about the shrimp being bland as they’ve already taken in all the flavor.
Now comes the fun part. Wrapping up the shrimp. First gather the wrappers together. Cut them diagonally
 Make sure to keep them covered under a wet kitchen towel. Otherwise they'll dry up and will be harder to roll.
Take one of the triangles and place a scored shrimp on it like so
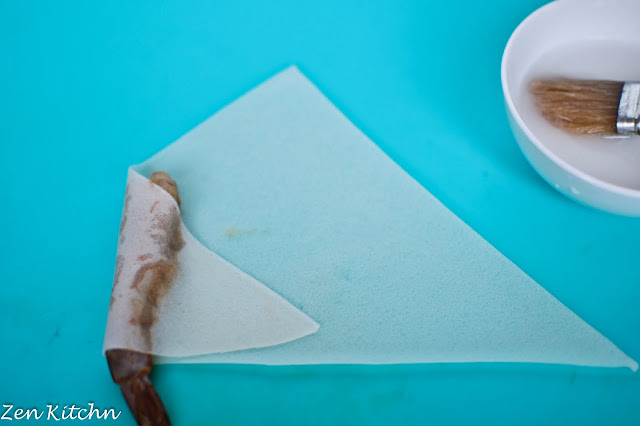
Fold one corner over tightly covering the shrimp. Make sure it's a tight wrap.
Roll it once and then fold the top over.
Keep folding till you get near to the other corner and brush some cornstarch-water mixture on the edge and seal it good
Keep repeating till all the shrimps gone
Deep fry the pieces in oil that's about 350 degrees F. When the rolls are added the oil should bubble vigorously. Enjoy with sweet chili sauce.

Thursday, July 28, 2011

Tom yum soup done differently

Each country has its own version of popular cuisine, modified to suit the taste of her people. Us Bengalis, we have our own style of Thai food that native Thais would never recognize. There’s this thick soup we used to get at restaurants in Bangladesh which, in all honesty could never be called by its authentic name of “tom yum goong” meaning thai soup with prawns.

We Bengali’s take everything a little too far. Our spicy dishes are a bit spicier, and sweet dishes are a tad sweeter than the food you would get anywhere else in the world. This soup is spicier than an original tom yum but if you ask me just as flavorful, if not more . :D

So if you are not afraid of a little heat try making this Bengali tom yum.

Recipe:
6 cups water
6 teaspoons chicken bouillon powder
3 tablespoons tomato ketchup
1-3 tablespoons Sriracha chili sauce
4 stalks of lemon grass
¼ cup of chicken sliced thinly
¼ cup of medium shrimp (peeled, deveined)
3 Egg yolks
3 tablespoons corn flour
½ cup canned mushroom
1teaspoon salt
2 tablespoons + 1 teaspoon sugar
3 tablespoons Vinegar

First peel off the first few outer layers from the lemon grass stalks and chop it into medium sized pieces. At this point feel free to smash the pieces with the back of your knife. This helps release the essential oils that flavor our food. These stalks although not eaten, impart a light lemony scent to the soup. 


Then separate the eggs and add a tablespoon of corn starch for each yolk. Make sure you save the whites for another dish.


And start mixing it up.


It’ll look crumbly in the beginning but have faith.


It’ll come together nicely into a thick paste.


Now, boil some water making sure it comes to a rolling boil.


And add all the chicken boullion powder. After a minute or two of boiling, add in lemon grass and the thin slices of chicken.


Now here comes the tricky part. If you add the yolk corn flour mixture directly into the hot broth you might end up with scrambled eggs as opposed to a thick creamy soup. Which I guess wouldn't taste bad, but we don’t want that for this recipe.

Take a ladel/ spoonful of the hot liquid and slowly pour it onto the egg paste and stir vigorously. 


Add another ladelful and stir again.


Pour the warm egg mixture into the broth mixture. Give it a quick stir and you'll get a smooth creamy consistency.


Add in the shrimp, ketchup, chili sauce, vinegar, sugar and salt and your soup will get a pretty orange hue. Make sure not to cook the soup for too long otherwise the shrimp will turn rubbery.


Sprinkle generous amounts of chopped cilantro and you have Bengali-Thai soup. Enjoy!! :)